Saturday 28 December 2013

DESIGN PRODUCTION - BRIEF 3 - CONTENT ORGANISATION

Before I started designing my outcomes I needed to create and organise  the content for my booklets, doing so enabled me to work out how much information will be included on each page of the outcome.

I reviewed my research collected into the Windowfarm building process and highlighted important steps and pieces of annotation. I then used the highlighted information to write the content for my build guide booklet


The final word count for the build guide came to 2,335


After generating content for the build guide I repeated the process of analysing my research to help create the content for my grow-guide.


The final word count for the grow guide came to 2,993. 


Finally, in past projects I have mentioned how writing the content for my outcomes was one of the most time consuming aspects of the project. As I am working to a very tight timescale for this brief I decided to try and reduce the amount of time spent writing annotation by re-writing the content taken from my research and from the Windowfarms website.

Thursday 12 December 2013

DESIGN PRODUCTION - BRIEF 3 - CRITICISM

Before breaking up for christmas we had our first criticism for the final brief, design for print and web. The criticism was important as it marked the last point of feedback we would receive before leaving college for christmas break.

We started the criticism by splitting into small groups of around six people. The session was fairly self-directed  so first we chose someone to go first and allocated five minutes to present with three minutes for feedback.

At this point in he brief I was still at a stage where I was developing my concept, therefore I presented my re-written brief, initial ideas and any other supporting material.

While my feedback was being verbally delivered I took note of the comments and ideas communicated by the other members of my group. 


FEEDBACK SHEET


ANALYSIS

After the session was over I reviewed my feedback sheet and anaylsed the points made so I could outline responses to help me progress from the session.

Advertising - An advertising campaign, or proposed campaign, is an essential part of the overall project. Not only will advertisements inform the target audience of the project, it will also act as a way of creating interest in the campaign. I need to consider how I can create a visual campaign that infroms the audience about the Windowfarms movement while reflecting the green/sustainable ethos of the project. Suggestions were made to research into green advertising and activism.

Advertising - The created advertising campaign should relate to both the urban environment, in which the target audience reside and the urban farming movement. If the campaign relates to both of the mentioned aspects it will be an accurate representation of the company, which focuses on providing indoor growing solutions to people living in an urban environment.


RESPONSES

In response to the feedback I will consider creating an integrated advertising campaign to raise awareness of the Windowfarms company and the campaigns aims and goals. Furthermore, I will research into green advertising to see how I could create a campaign that not only communicates information but also reflects the sustainable values promoted by the project.


Tuesday 10 December 2013

DESIGN PRODUCTION - WEB - FINAL CRITICISM

Firstly, this weeks web criticism followed the same structure as the final print criticism, with the group being split in two forming the opposing critique groups. 

Group A (my group) were the first group asked to layout the elements of the web brief ready for the criticism. 

At this stage of the project I was unable to present a working, coded website as I only started coding it the day before. Despite this, I presented PDF. files of my outcome so viewers could get an understanding of the layout, colour scheme and aesthetic choices made so far. 


Furthermore, I also created a question for the criticism that asked about the navigation of the website. The question posed to members of the other group asked for comments on the sites navigation, as initially I was unsure whether to fit all of the sites content on one continuous scrolling page. The feature would to help make the site easier to navigate for my audience, an idea that arouse after becoming inspired from some websites I viewed in my research. 

QUESTION

  1. Would the website work better as a continuous scroll with all the content on one page? At the moment I have a mixture of a continuous scrolling timeline and fixed resolution pages, do they work together?


FEEDBACK

Below is the feedback I received from the session.


ANALYSIS

A lot of the feedback received from the criticism is really useful, making comments on my websites navigation, design decisions and aesthetic relevance. My question generated some really applicable comments which will help influence my final decisions regarding the navigation of the site. Moreover, responding to the feedback will allow me to develop the functionality and relevance of my site as problems were highlighted that I had not foreseen.


Below are some of the useful comments received from the session;

  • Placing all the content on a single, continuous scrolling page could get confusing.
  • Separate pages allow for better navigation.
  • Continuous scroll feature appropriate for timeline but not other pages.
  • Consider using the same title font for all pages to make the website more consistent.
  • Body copy font doesn't really work with the websites aesthetics, consider choosing a new one.
  • Consider making changes to the body copy as it is not as in-keeping with the rest of the aesthetic elements. 
  • Keep it simple in terms of text - balance.
  • If you make rollover buttons keep them simple as the site is already visually busy.


RESPONSES

Analyzing the responses I received during the criticism allowed me to highlight areas of my project that, with development, could be refined and in turn improve the quality and relevance of my final outcome.

Below are the areas/changes that I will develop;


Finalized navigation

  • The feedback I received commented on how a continuous scrolling form of navigation is suitable for the timeline, but is however unsuitable for other pages. Moreover, if all of the content was fit onto one page it could become confusing for the viewer to navigate.
  • In response to these comments I have decided to utilize a continuous scrolling feature for the timeline section of my website, but have links from my navigation bar to other separate pages. 


Title fonts - Consistency

  • Comments were also made about the inconsistency of my title fonts. The reasoning for the varying styles of typography was to create a messy, D.I.Y zine style aesthetic which holds relevance to my target audience. However, people viewing the site felt that it was a feature that could be improved to make the websites aesthetics more consistent. Moreover, a more consistent heading font will also help to establish a strong typeface hierarchy which coincidentally has relevance to navigation. 
  • In response to the comments on my inconsistent heading fonts I plan to recreate each title with same typeface to ensure that consistency is apparent. However, I make sure that the D.I.Y style aesthetics are still apparent by roughly hand-rendering each title to create imperfections and dissimilar letter forms.    


New body copy font

  • Finally, numerous comments were also made on the font used for the body copy on the website. I initially chose to use a web-safe typeface called 'Lucida Unicode'  as it had similarities to typewriter letter-forms only without the serifs. Typewriter style fonts have relevance to D.I.Y zine culture as typewriters were often used as a tool of creation, I wanted to try an capture this aspect with my font but obviously failed to achieve this.
  • In response to the comments made I will find a new font for the body-copy of my outcome, first looking at serif typefaces as their letter-forms have more similarities in comparison to a typewriter style font. 

Monday 9 December 2013

DESIGN PRODUCTION - BRIEF 3 - CONCEPT

RE-WRITTEN BRIEF

Below is my re-written version of the original ISTD brief 'Not Just Fleurons' .


FURTHER DETAIL

After analysing the re-written brief I felt that certain parts, such as the target audience, would benefit from added input to help further define the small details. Therefore, I decided to go over the brief again and fine-tune it, ensuring that the finer details where covered.


BRIEF TITLE - URBAN FARMER

THE BRIEF -  People living in cities do not know about the benefits of growing their own food, and if they did, they lack the access to the space needed to start growing their own vegetables. In a modern society where the foods we consume lack the essential nutrients needed to develop and maintain a healthy diet and body, more and more people have started turning to alternate growing techniques. One moment, relevant to the city environment is urban farming, which involves growing healthy, home grown produce in an urban environment.

CONCEPT - Create an integrated information pack, website and supporting advertising campaign to inform people living in a city environment about the urban farming movement and the benefits of growing and consuming your own food. The information pack should provide the audience with information relevant to urban farming and offer them a way of growing their own vegetables from the comfort of their own flat or apartment.

TARGET AUDIENCE - The target audience will consist of people living in an urban environment, ages between 16 & 30. - Further define.

TONE OF VOICE - To successfully communicate the information the tone of voice will be persuasive and informative.   

CONSIDERATIONS - How will the outcome grab the audiences attention? How will I create room for people living in cities to grow their own food? How do I get the audience to make the effort and engage with the project? How will the printed aspects of the project reflect the green nature of the brief? How will the varying elements integrate to create a seamless identity?

MANDATORY REQUIREMENTS - Research and development. Proposals. Strategy. Prototypes and design boards.

DELIVERABLES - Prototypes and Design boards.


Project progression will be displayed through a series of design boards.


FURTHER DEFINING THE AUDIENCE 

After revising the re-written brief I still felt that the audience could be further defined. During past sessions with Phil and Lorraine we discussed the importance of defining a specific target audience at length. Therefore, I decided to spend time developing a focused and appropriate audience for the brief. 

I would have liked to define the audience through the distribution and analysis of a survey. However, due to the tight timescale of the brief combined with unorganised time management I unfortunately do not have time to wait and collect survey responses. Instead I have chosen to save time by moving the project along quickly by defining the audience myself.


I started the process by defining my audience demographic, defining this will help me outline who is most likely to interact with the project:

Age - Between the ages of 16 - 30 years old.

Location - Living in an urban/city environment. Housed in a flat or apartment style accomodation.

Gender - Unisex - gender has no relevance. 

Income level - Low or non existent.

Education level - Educated to a college level or higher.

Marital or family status - Possibly married, no children.


Occupation - Student/young working professional.

Ethnic background - Holds no relevance.


Next, I defined the audience psychographic, which relates to their more personal characteristics. Defining the audience psychographic will enable me to determine how the outcome will fit into the audiences lifestyle:

Personality -  Members of the audience are cultured, educated and observant. They are confident in their daily lives and have an imaginative way of looking at the world.

Values - Members of the audience have an informed knowledge of health and health eating, they are interested in personal fitness and staying in shape. Additionally, they understand the importance of living a sustainable lifestyle and have a keen interest in environmental movements.  

Interests/hobbies - Fitness, spots, healthy eating, art and design, nature. 

Behavior - Audience members are focused, and successful in life. When a goal is set it is achieved. When they commit to a task, they fully commit. 


CONCEPT DEVELOPMENT 

After finalising a focused target audience I felt that I was in an informed enough position to develop a strong, relevant concept for the project. 


AUDIENCE 
The primary audience for the project will consist of young adults who live in a city environment. Prominently consisting of students and young working adults the audience will reside in urban flats and apartments that provide users with no space for growing food. Additionally, members of the audience are not overly affluent, and therefore eating healthily is not always the most cost effective way of living. However, despite this, members of the audience have an informed knowledge and focused interest in healthy eating, and therefore are looking for ways to overcome the expenses associated with living and eating healthily.


PURPOSE 
The purpose of the project will be to offer the audience a solution to the lack of growing space that city residents encounter, providing them with the information to then go and create their own indoor garden and grow their own healthy produce. 


CONTENT 
To successfully educate the audience about the indoor growing technique both a website, information pack and integrated advertising campaign will be produced.  The advertising campaign will direct members of the audience to the website where further information about the product will be offered. Additionally, the website will also act as a platform for the distribution of the information pack. The pack itself will contain booklets that offer step by step instructions as to how to construct the proposed growing solution. Additionally, the pack will also include a growing booklet that provides users with information on how to successfully grow plants.
  

FORM 
The focus of the project will be the printed information pack as it will provide the audience with the solution to growing their own food. To successfully communicate this information a ‘build guide’ booklet will be produced that directs the construction of the growing solution.

The website will act as a platform for users to access information about the project and solution while also providing them with a place to purchase the product. The website will be responsive to ensure that its content and information are always accessible from whatever device the user chooses to access the internet.


WHAT 
To provide the audience with the information needed to grow their own food in an urban environment I will create a method of growing plants indoors. The technique will allow users to grow their own produce from the comfort of their own home in a completely sustainable, environmentally friendly way. To distribute this information I will create a printed information pack which guides users through the set of construction instructions. Moreover, I will also create an integrated website and visual campaign to support the printed aspect of the project.

WHY
People living in cities do not know about the benefits of growing their own food, and if they did, they lack the access to the space needed to start growing their own vegetables. In a modern society where the foods we consume lack the essential nutrients needed to develop and maintain a healthy diet and body, more and more people have started turning to alternate growing techniques. One moment, relevant to the city environment is urban farming, which involves growing healthy, home grown produce in an urban environment.

Wednesday 4 December 2013

CREATIVE SUITE - SESSION 4

We started the session by highlighting the eight print related errors on the indesign document made available to us at the start of the session.


The eight errors;

  • Background colour on first page was not stretched to the bleed line.
  • Missing picture link.
  • Extra colours included - Pink and Green.
  • RGB colour used for the third bird image.
  • Yellow image was at a 72dpi resolution.
  • Third bird image is in an RGB colour mode.
  • Dimensions of first bird too large.
  • Last piece of text was in registration black.

The session was useful as it further reminded us of information covered in previous creative suite sessions regarding the problems that can arise when sending an outcome to print. 

Tuesday 3 December 2013

DESIGN PRODUCTION - BRIEF 1 - FINAL CRITIQUE

At the start of the session we were split into our two groups, A & B.

We (group A) started the session by creating a layout of project elements that shows our current progression so far. To help communicate my concept and project development I displayed some concept sheets, thumbnails (large and small) and a black and white proof print displaying the actual scale and current content.


I also listed some questions regarding parts of the project that I am unsure about, as I am at a stage of the design process where I am focusing on my final product I wanted the majority of feedback to focus on my layouts, aesthetic choices and the functionality of the chosen form.


QUESTIONS
  1. Is the header font included enough on the pages of the to be relevant? It has currently only been used on a few pages which has made me consider removing it.
  2. Does the chosen form (Rectangular dimensions) function appropriately? 
  3. Have you come across any problems when looking through the mock up?
  4. The guide is supposed to be opened to the left, did you do this?


Next to my question sheet I left a sheet of lined paper so that classmates who are critiquing my project have somewhere to write feedback, this also allows me to review the comments made and assess whether changes need to be made in response.


FEEDBACK 

Below is the feedback I received.


ANALYSIS

The feedback I received in response to my initial questions outlines some really relevant points regarding my projects progression and outcome. Reviewing the feedback has allowed me to highlight problems that when addressed will improve the function and aesthetic quality of my product.

Below I have listed the most useful points;

  • The header font is relevant, it works well at grabbing viewer attention and helps to form a clear type hierarchy. The body copy font also effectively mixes with the chosen header font creating an appealing aesthetic for viewers. 
  • Check for spelling mistakes!
  • I need to consider what colour scheme I will have and how this will affect the different design elements of my outcome.
  • The majority of participants who viewed my laser proof opened it to the left, this is a really important aspect of my design as if the guide is opened to the wrong side it could affect the amount of content my audience see.


RESPONSES


Firstly, my question regarding the header font was asked for peace of mind, I had only used the header font on a few pages so wanted to know if it was relevant or if it looked out of place. The feedback I received from the critique shows that people thought the header font is relevant and works well at creating an effective hierarchy. I will continue to use the font, and also increase its use through the publication to give it further relevance.

Comments also pointed towards the fact that I need to establish a colour scheme, up to this moment in time I hadn't given much consideration towards colour which was a mistake. However, in response to the feedback received I will define a colour scheme which will be used consistently throughout the publication. 


FINAL COMMENTS

I also received feedback that was less useful, either because it addressed problems that had already been amended or because it commented on something that was not a problem in the first place. The reason I received slightly irrelevant feedback is because I did not communicate enough project related information, certain design decisions had been finalised but made apparent through my design elements. 

The way to overcome this problem in future critiques and evaluations is to create design boards which communicate the progression of my project from the concept/research stages right through to images of the final outcome. The boards allow the audience to see the story of the project which helps communicate why certain design decisions have been made.


Sunday 1 December 2013

DESIGN PRODUCTION - BRIEF 2 - CONTENT ORGANISATION

Before I could start designing my website I needed to refine and organise my content so I know how much information will be included on each page of the site.


HOMEPAGE CONTENT;

My homepage will give a brief introduction to the sites purpose and aims while directing them through to the sites content.

Points I want my homepage to communicate;

  • What is the site about?
  • The important of skateboard history.

TEXT;
Skateboarding history is full of interesting movements, ticks and figures that have helped to influence the direction and state of the sport today. Many of these definitive historic aspects still hold influence in modern skateboard culture, from the shape of the skateboard deck to the tricks that are practiced; all have been influenced in some way by past events.Therefore, the sports history is significance whether you’re a skateboarder or just interested in the sport, this website offers users an interesting and insightful look at the evolution of the sport, and how its history is still relevant today. 


TIMELINE CONTENT;

Next, I used the skateboard history research collected in response to the summer brief combined with some further secondary research to form the content of my timeline. Results from my survey showed that my audience are generally interested in learning about the history of the sport but generally find it unengaging. Therefore, I wanted to focus the content of timeline on specific parts of the sports progression and other important definitive moments in the sports history. 


  • 1918 - 48 - Someone broke the apple box off the front of his apple box skate scooter and started a new trend.
  • 1958 - The first skateboards start to appear and were made by surfers with the general idea that they could be used to curse out the oceans flat spells.
  • 1958 - Newspapers printed stories on the vast number of school children making skateboards in their wood working classes.
  • 1962 - Skateboarding starts rapidly gaining popularity, since commercial boards are unavailable skaters use anything they can get their hands to use for a deck.
  • 1963 - Companies started using multi-layered hardwoods for skateboard decks and screen-printed graphics and logos onto them. Companies such as Makaha, Hobie and Jack’s are the industry leaders and start holding their own competitions.
  • 1963 - Clay wheels used for skateboards.
  • 1964 - The first issue of 'Skateboarder magazine appears'.
  • 1965 - Skateboarding simply dies. 
  • 1966 - Underground skateboard movements start focusing on different terrain and start using short boards.
  • 1969 - Skateboarding progresses into the back yard pool skating era.
  • 1969 - Also signifies the year the first 'dogtown' boards were painted. 
  • 1971 - Vans design the first skateboard shoe.
  • 1972 - Frank Nasworthy takes note of the urethane wheels used for roller skates and adapts them for skateboarding starting the company 'Cadillac wheels'.
  • 1975The Bahne Cadillac Contest is held in Del Mar and brings together a vast range of skaters with varying styles, among them are the infamous Z-Boys who wipe the floor with their competition.
  • 1978 - Alan Gelfand invented a trick called the ollie. The trick entails slamming down the tail of the board while jumping to pop up into the air. The trick completely revolutionizes skateboarding.
  • 1978 - Steve rocco forms SMA Rocco Division, which begets 'Blind' which in turn became 'World Industries'. These skateboarder run companies are free to be creative and help shape the direction of the sport.
  • 1978 - Skateboard company Powell Peralta was set up by George Powell and Stacey Peralta.
  • 1979 - Towards the end of the 70's skateboarding started losing popularity again, skateparks all over America started closing due to high insurance prices and consequent closures.
  • 1979 - The 'bones brigade' skate team was set up by Stacey Peralta consisting of Tony Hawk, Rodney Mullen, Steve Caballero, Lance Mountain, Tommy Guerrero and Mike McGill.
  • 1980 - 'Thrasher' skateboard magazine is started by Fausto Vitello.
  • 1980 - The 1980's board style was wider than previous styles with a short nose and large tail, rails were also added to the underneath to help with grinds.
  • 1983 - VCRs were used to film the first bones brigade video - The Bones Brigade Video Show.
  • 1989 - The sport starts to loose popularity again, vert skating specifically has a huge dip in interest. 
  • 1990 - Skateboarding finds common ground with the Punk movement and slowly starts gaining popularity again.
  • 1990 - Sees the introduction of the boards shape we know and love today, smaller wheels are used to help reduce weight and make flip tricks easier and lighter trucks are also developed.
  • 1995 - ESPN hold the first ever X-Games.
  • 1995 - Thrasher celebrates 15 years of publication and is one of the longest running skateboard magazines.
  • 1999 - Tony Hawks Pro Skater Playstation game is released.
  • 2000's - Current - Skateboarding has continued to progress to a worldwide platform, the sport is practiced round the world and the industry has seen a massive raise in commercial funding.


ABOUT PAGE CONTENT 

The about page will offer users a more in depth explanation of why the site was created and what it hopes to achieve. 


Points I want my About page to communicate;

  • What is the site about?
  • The important of skateboard history.
  • What will the site achieve?
  • Why?
TEXT;
Skateboarding relatively new as a spot having only being conceived in the past 100 years, despite this the sport has a rich history and culture that is still continuing to thrive in the present day.

The aim of the website is to provide users with an insightful look at the sports history. However, there will be no monotonous list of dates and information found here. Instead, all informative data has been visually supported with graphic illustrations to make the content engaging for the reader.


The website attempts to inform and educate users about definitive points in skateboard history, in an attempt to highlight its importance to a modern audience.  An understanding skateboard history is beneficial as it helps users to recognize the context behind some of the tricks and trends found within the skateboard industry today. 


BLOG PAGE CONTENT 

The blog page will display a neat grid of skateboard history related images, due to its content the blog page will not need any introduction explaining its function.

However, the page will need a collection of historic skateboard related imagery to form the initial pictorial content. Unfortunately, imagery collected through primary research methods such as my own photographs will look modern and communicate nothing about the historic information communicated by the timeline. Therefore, I am unable to collect any imagery through primary sources, instead I will have to collect images from the internet and reference the photographer and the site from which the image was taken.

Images research - Link


SOURCES PAGE CONTENT 

The sources page is also pretty self explanatory and so needs little or no introduction. 


TEXT;
All of the information displayed on the site regarding the history and evolution of skateboarding was collected from the list of sources below. Some of the dates features are accurate guesses as nobody will ever know when the first ever skateboard was created or who by. However, despite some disputable dates are all information presented is accurate to the research source it was collected from. 

Friday 29 November 2013

DESIGN PROCESS - RESPONSIVE - BRIEF FIVE SELECTION

CHOOSING THE D&AD BRIEF -


Firstly, I reviewed all of the brief choices available on the D&AD website, of all the briefs available only two asked participants to create outcomes that would result in no commercial gain for the company. The two more ethically motivated briefs were set by a charity called the 'National Trust' and advertising agency 'WPP'.

The 'WPP' brief asks creatives to create a campaign to evoke immediate action against climate change, whereas the 'National Trust' brief wants to reintroduce itself to a younger audience in an attempt to reconnect more people to nature. As an ethically driven designer both causes are appealing, however one brief connects to me on a more personal level which is why I selected it as my D&AD brief choice.

As a young child I was lucky enough to be brought up with nature at my fingertips, only a short walk from my house were fields and and a small Forrest. My childhood consisted of regular adventures into this local wilderness where me and my fiends built makeshift castles and fought dragons. As outlined in the brief people in modern society are becoming more and more distanced from the outdoors and nature, the biggest victims are the children who spend more time indoors interacting with technology than playing outside and discovering the natural beauty of the world.


CHOSEN BRIEF - 'NATIONAL TRUST - RECONNET OUR RELATIONSHIP WITH NATURE AND BEAUTY'


DISSECTING THE BRIEF 

After selecting the National Trust brief I used the questions from a previous responsive session to help me dissect the brief and highlight information relevant to my projects direction.


What is the problem?
  • A large quantity of people in modern society are spending less time outdoors and more time indoors interacting with various technologies. People are forgetting the about importance of connecting to nature, an almost instinctual social habit, and are replacing it with time spent on various devices.   
  • The 'National Trust' have a lingering image that their members are elderly and that their available activities reflect this older audience.


What are they asking you to do?
  • Create a visual campaign that places the national trust in the interests of a younger audience.
  • Make the National Trust appealing to the modern visitor.


What are they trying to achieve?
  • The trust is trying to attract a younger audience to connect more with nature.
  • Re-establish the importance of interacting with nature.
  • Attract more young members to join the trust.


Who will benefit?
  • Families and children who begin to interact with the natural environment more.
  • The national trust.
  • The projects, heritage sites, and natural environments that the trust supports and protects.

What is the message?
  • Re-establish the importance of connecting to nature to a younger audience.

Who is the audience?
  • People aged 25 - 40.
  • Young adults.
  • Parents/Families.

How will the message be delivered? 
  • Integrated visual campaign. 
  • Advertising.

Can you see any problems?
  • Yes, the target audience is not overly specific, young adults around the age of 25 will not interact with an integrated campaign aimed at families. The audience needs defining further before an informed start can be made on the project.


RE-WRITING THE BRIEF

When re-writing the brief I focused the initial concept by further defining the target audience, outlining them as parents and families with young children. Defining a specific audience helped me to be specific when outlining a tone of voice and considerations.


Thursday 28 November 2013

DESIGN PRODUCTION - BRIEF 2 - PRODUCTION

PROJECT DEVELOPMENT 

After outlining my final concept I started developing my outcome, I started this process by creating website site maps that explored the navigation of my website. Additionally, I also created a series of thumbnail designs and scamps to help me define the basic layout and navigation of my site. 

SITEMAPS

I started the design process by creating a range of sitemaps that developed through a process of navigation analysis to form the final mapping of my website. 


THUMBNAILS 

Next, I created a range of thumbnail layouts for each page of the site exploring different page compositions. When designing the thumbnails I wanted to focus on the navigation of content, content hierarchy and the amount of information displayed on each page.


SCAMPS 

Developing from the initial thumbnail layouts I created a range of scamps to further explore the most successful compositions.


DESIGN DECISIONS 

After developing a basic site layout through my series of thumbnails and scamps I was in a position to start making design decisions regarding the aesthetics of the website. 

Aesthetic decisions;
  • Typefaces.
  • Colour scheme.
  • Illustration style.


TYPEFACES

In this project I will not be outlining a specific header font, as I want the typography to be individual and hand-rendered to reflect the DIY ethos of skateboarding history. A consistent style of typography will be used for the header of each page to create a recognizable title. However, type applied on the timeline will vary and evolve with the content shown.


When choosing a typeface for the body copy of the site I wanted to ensure that the font was web-safe. Choosing a web-safe font will ensure that the font is accurately represented when accessed by users on the internet. Moreover, when choosing a font I looked for a typeface that is aesthetically relevant to the content of my site, but is also legible at various sizes.

After assessing the web-safe fonts available to designers I outlined 'Courier new' as my chosen typeface. The font has relevance to my content as it has similar qualities to a typewriter fonts. When researching into DIY skateboard zines I noticed that a lot of the typefaces applied were all typewriter style fonts. Therefore, 'Courier New' has both aesthetic and historic relevance to my sites content and so is an appropriate choice of typeface. 


COLOUR SCHEME

When defining the colour scheme for the site I wanted to create an aesthetic image that would reflect the vibrant nature of skateboarding history while acting as an eye catching visual prop for the audience. Therefore, when outlining my colour scheme I chose colours that would reflect the colourful past of skateboarding, specifically relating to the movement in the 60s and 70s when skateboarding rapidly started gaining popularity.

Similarly to the choice of typeface, I wanted the chosen colours to be web-safe to ensure that my content is accurately represented when accessed by the audience online. To ensure that the chosen colours were web-safe I used illustrator and opened the web-safe colour collection. 

My chosen colours are displayed below with their individual colour codes.


ILLUSTRATIONS 

The majority of my sites content will be illustrative, as outlined in my concept it is essential to have an illustration heavy content to successfully communicate information to my target audience. 

To reflect the DIY ethos present throughout skateboarding's history I decided to hand draw each individual illustration. Creating my images this way will help to form a consistent aesthetic theme as the typographic headings will also be created by hand. Moreover, the hand-drawn illustrations will also help to create the rough, grungy aesthetic outlined in the development stages of the project.


WIREFRAMES

The wireframes for the simple pages of the site, such as homepage, about, sources and blog were all created prior to the creation of any of digital aspects. Due to their simple layout creating the wireframes for these individual was not challenging, as there were only a few elements that needed sizing and placing. However, due to the complex layout of my timeline, combined with multiple illustrations and type, creating a reliable wireframe for my timeline just was not achieveable. Therefore, before creating the timeline wireframe I created a mock up of the website in indesign and then used the document to help me take accurate measurements. 


HOMEPAGE


ABOUT


SOURCES


BLOG


TIMELINE 


CONTENT ORGANISATION

After designing my range of wireframes I was in a position to start the production of my website. However, before doing so, I needed to finalise and organise the content of my website. The organised content will be used to help me highlight important parts of skateboadings history which will then be illustrated to visually communicate the content to the audience. 

Content organisation - Link


PRODUCTION

Finally, after producing the majority of my wireframes I started the production of my website. The process was started by creating the range of hand-drawn illustrations that will form the majority of my sites content. 

Due to the amount of illustrations and the lengthy process of hand drawing each individual image the creation process took up a large amount of my time, more so than I had originally accounted for. This would later come to affect the overall run of the project as I was already working to a very tight timescale after the first brief. 


After the illsurations had been scanned in I used the live trace tool in Adobe Illustrator to create vectors of each individual illustration. A colour from the outlined color scheme could then be applied to specific illustrations.


SAVING IMAGES 

After creating all of the individual illustrations I saved each one as an individual .png file with transparent background. All illustrations were saved into the images file in the root folder ready to be applied to the website during the coding stage of the project.


MONO-PRINTS

While collecting aesthetic research I came across a website that successfully applied a grungy style aesthetic that effectively reflected DIY zine culture. A similar, grungy aesthetic would relate perfectly to the content of the website and engage the target audience.  

To create the desired, rough looking aesthetic I first needed to create a series of textured backgrounds, to do so I utlised a print method called mono printing. 


INITIAL PRINTS 


After the prints had been scanned in I applied a colour selected from the chosen colour scheme to each of the backgrounds to ensure that the website was vibrant and engaging as outlined earlier in the project.


HOMEPAGE BACKGROUND

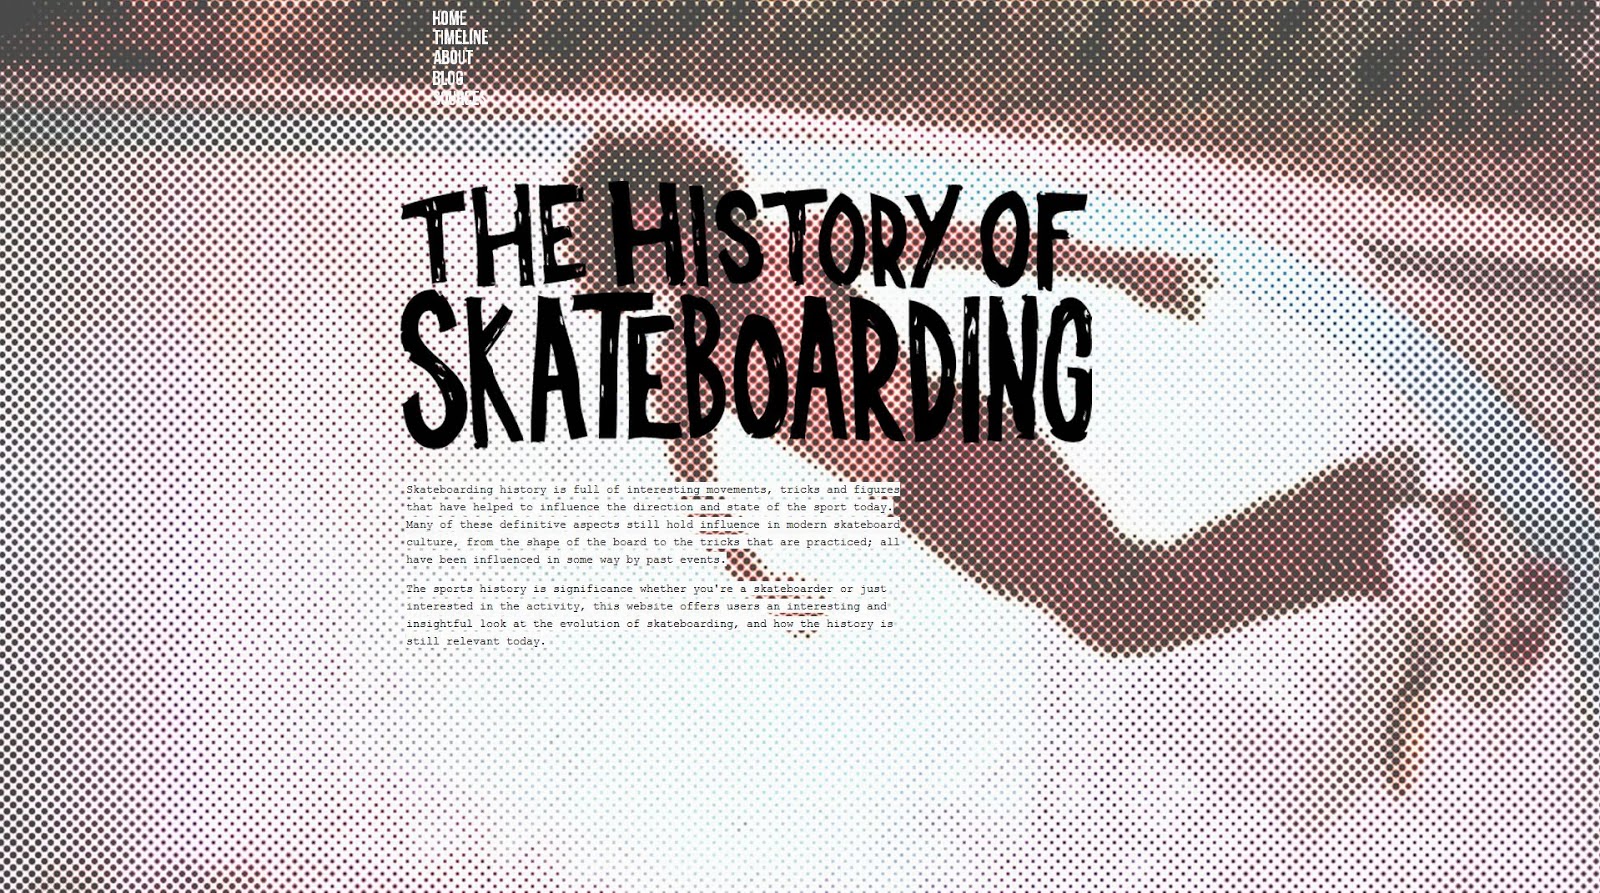
During the development stages of my project I decided that the background of the homepage will be formed from an image relating to an important point of skateboarding history. As it is impossible to take a historically relevant image of my own I decided to utilise one from the internet and adapt it slightly. 

Using Photoshop I applied a halftone effect to an image of Tony Alva in his early pool riding days, this left the image recognizable and allowed me to adjust the images resolution to ensure that the image quality was high.


MOCK-UP LAYOUTS 

After I had created the illustrations and backgrounds for my website I had all the necessary content needed to start producing my website. As mentioned above, creating the wireframes for the timeline section of my site was almost impossible due to the complex layout and extensive content. Therefore, I started the production process by first creating mock-up layouts of the site in Indesign. The digital layouts were then used as a reference when creating the timeline page wireframe and coding the webiste.


HOMEPAGE 


TIMELINE 


ABOUT


BLOG


SOURCES 


CODING

After creating my series of wireframes and the mocked-up version of my website in Indesign I was ready to start the coding aspect of my websites production. 

As it had been a few weeks since the last web design session with Simon I recapped my notes taken during the sessions to jog my memory of how the coding should be completed. Unfortunately, the notes taken during the session were not that helpful due to the lack of informed content on each post. Therefore, I had to join a website called code-academy to help me learn the coding process. 


The website takes users through step by step instructions on how to code a website from scratch. The website was helpful in teaching the basics of coding and how html and css work together to create the different aspects of the website.

After a brief re-cap of the basics of coding I started with the digital production of my website.


  • Coding was started by first creating five individual documents for each of the five pages of the website.
  • I then outlined the title of the website on each page between the <head> tags, this code enabled the sites title to appear on the browser upon opening each page.


  • As outlined in the development stages of the project I wanted the site to be responsive so that the sites content could be accessed from multiple devices. Therefore, I started the css coding by adding a responsive background to the homepage.
  • It was a very time consuming process as responsive image backgrounds were not covered during the web sessions. Therefore, I took information from coding websites on the internet that instructed users as to how to create a working responsive background.


  • I also added the navigation to each page, this will allow users to link from page to page as outlined by my sitemap during the development stages of the project.


PROBLEMS 

As I progressed with the coding aspect of my website I encountered multiple problems regarding the placement and layout of various items, making the website responsive and creating a working navigation bar. All of the tasks only require a basic knowledge of coding, however I spent hours and hours trying to resolve small problems with little progression, this was stressful and frustrating as I only had a limited amount of time to produce the website. 

  • The first problem I encountered was related to the individual positioning and sizing of the various website elements. 


  • Although the basic website navigation was working I was unable to get the navigation bar looking how I desired.  


  • Due to a lack of time and knowledge I could not add all of the individual illustrations to form the visual content of my website. To quickly solve the problem I had to add the timeline to the website as a singular image. 
  • Despite adding a css. rule depicting the size of the image it appeared over-sized and caused a loss of content and functionality.


Due to bad project management and a lack of coding knowledge I was left with little time to develop my website to the standard that I wish I could have. I feel truly disappointed with my outcome as it lacks any sort of similarity to my outlined design. Furthermore, I feel that all of the time spent creating the sites aesthetic image and individual illustrations is time wasted as they were never properly applied to a functioning site.

In future, when I am struggling with something i need to ask for help, instead trying to teach it to myself and getting frustrated and stressed when I fail to understand it.